Archive for the labs Category

React Native vs PWA

Friday, December 12th, 2025

Choosing the right technology for building a mobile experience has become a key strategic decision for modern companies. With users expecting fast, intuitive and reliable applications across all devices, businesses often find themselves comparing two popular approaches: React Native and Progressive Web Apps (PWA). Each offers unique strengths and limitations — and the choice between them can significantly impact development cost, user experience, and long-term scalability.

Why companies face the mobile technology choice

This guide explores why many businesses struggle to decide how to build their mobile presence. With users expecting seamless cross-device experiences, companies must balance performance, cost, development speed, and long-term scalability. As the number of available technologies grows, choosing the right approach is no longer a simple technical decision — it directly impacts user engagement, product quality, and overall business goals.

A quick overview of React Native and PWA

React Native is a framework that allows developers to build mobile applications using JavaScript and React, while still delivering a near-native experience on both iOS and Android. It compiles to native components, giving access to device capabilities and ensuring high performance.

Progressive Web Apps (PWAs), on the other hand, are web applications enhanced with modern browser features such as offline access, push notifications, and installability. They run directly in the browser but can feel similar to native apps—without requiring distribution through app stores.

Together, these two approaches represent fundamentally different paths to delivering mobile experiences: one native-oriented, the other web-driven.

What is React Native?

React Native is a popular framework created by Meta that allows developers to build mobile applications using JavaScript and React. Instead of rendering content in a browser, React Native uses real native components, delivering an experience that feels close to fully native apps on both iOS and Android. This makes it an attractive choice for businesses that want strong performance without building two separate mobile codebases.

How it works and its key features

React Native operates on a “learn once, write anywhere” principle. Developers write UI logic in JavaScript, and React Native bridges this logic to native components and APIs. This hybrid approach combines the speed of web development with the performance of native mobile technology.

Key features include:

  • Native components — interfaces render using real iOS/Android UI elements.
  • Hot Reloading / Fast Refresh — rapid iteration during development.
  • Rich ecosystem — thousands of libraries, packages and community tools.
  • Access to device APIs — camera, GPS, accelerometer, haptics, push notifications and more.
  • Cross-platform support — the same codebase can target both iOS and Android.

When React Native works best

React Native is an excellent choice when your project requires:

  • High-performance mobile interactions (smooth animations, gesture support, native-level user interface).
  • Access to advanced device features that PWAs cannot fully support.
  • A consistent cross-platform experience without having to build two separate native apps.
  • Faster development of complex mobile products such as social networks, fintech applications, or consumer platforms.
  • Long-term scalability, where native integration may be needed in the future.

In practice, React Native works well for consumer applications that need to be fast, polished, and reliable.

Examples of well-known React Native apps

Many global companies rely on React Native for major parts of their mobile applications, including:

  • Facebook — parts of the main app and Ads Manager
  • Instagram — features like the post creation flow
  • Shopify — uses React Native extensively in its mobile products
  • Walmart — improved performance and development speed using RN
  • Discord — Android app rewritten in React Native for performance gains
  • Bloomberg — mobile news and media app

These examples highlight React Native’s ability to support apps with millions of active users while maintaining performance and reliability.

What is a PWA (Progressive Web App)?

A Progressive Web App (PWA) is a modern type of web application enhanced with additional capabilities that make it behave more like a native mobile app. PWAs run directly in the browser but can be installed on a user’s home screen, send push notifications, work offline and load extremely fast thanks to technologies like service workers and caching strategies.

Because they rely on standard web technologies and are platform-agnostic, PWAs allow businesses to deliver a mobile-friendly, app-like experience without forcing users to download anything from an app store.

How PWAs work and their key features

PWAs are built using standard web technologies — HTML, CSS and JavaScript — but enriched with modern browser APIs. The core mechanism behind PWAs is the service worker, a background script that controls caching, offline behavior and network optimization.

Key features include:

  • Installability — users can add the app to their home screen with one tap, without an app store.
  • Offline support — service workers enable PWAs to work even with limited or no internet connection.
  • Fast loading — aggressive caching makes PWAs load quickly, even on slow networks.
  • Push notifications — supported on many platforms, enabling re-engagement.
  • Cross-platform reach — PWAs run on any device with a modern browser.
  • Lightweight footprint — apps are small and don’t require installation packages.

PWAs aim to combine the best of web accessibility with the convenience of a mobile application.

When PWAs are the best choice

PWAs work particularly well when a business needs:

  • A fast and accessible mobile presence without forcing app installation.
  • Lower development and maintenance costs, thanks to a single web-based codebase.
  • A strong SEO presence, since PWAs are indexable by search engines.
  • Rapid deployment and updates without waiting for App Store or Google Play reviews.
  • A lightweight solution that can reach users on any device, anywhere.
  • An MVP or early-stage product, where speed and cost-efficiency matter most.

PWAs are ideal when accessibility, reach and frictionless user onboarding are the top priorities.

Examples of companies using PWAs

Many major organizations use PWAs to improve performance, engagement and conversion rates, including:

  • Twitter — Twitter Lite reduced data usage and increased retention on low-bandwidth markets.
  • Starbucks — PWA doubled daily active users and improved offline access for orders.
  • Pinterest — PWA increased sign-ups and user engagement dramatically.
  • Spotify — web app behaves almost identically to the native app.
  • AliExpress — PWA increased conversion rates for mobile users.

These examples show how PWAs can match or even outperform native apps in reach and speed, especially in global or resource-constrained markets.

React Native vs PWA — Detailed Comparison

User experience (UX)

React Native offers a near-native user experience, using real iOS and Android components. Animations, gestures and navigation feel smooth and natural, making it ideal for complex or highly interactive interfaces.

PWAs deliver a consistent experience across all devices but remain limited by browser capabilities. While modern PWAs feel increasingly app-like, UI performance and interactions may not match the polish of fully native components.

Performance

React Native generally provides higher performance because it uses native modules and views. Apps run efficiently even when handling heavy animations, background processes or large amounts of data.

PWAs are extremely fast when it comes to loading and basic interactions, but they rely on the browser engine. This can introduce limitations for processor-heavy tasks, advanced animations or complex media operations.

Offline capabilities

React Native apps can fully operate offline, storing data locally and syncing with servers when connectivity returns.
PWAs also support offline mode through service workers, allowing caching of pages, assets and content. However, offline capabilities are more limited and depend on how much data can realistically be cached within the browser.

Access to device features (camera, GPS, Bluetooth, push notifications)

React Native provides deep access to device hardware and native APIs, including camera, GPS, file system, accelerometer, Bluetooth and advanced push notifications.

PWAs support some hardware features, but browser restrictions vary by device and platform. While capabilities have improved (e.g., camera access, geolocation, limited notifications), PWAs still cannot access many native features—especially on iOS.

Updates and maintenance

React Native apps traditionally require updates through app stores, but modern tooling has significantly simplified this process. Solutions like Expo offer powerful features such as over-the-air updates (OTA), automated building pipelines and seamless deployment tools. Expo makes it easy to push changes instantly, build native binaries for testing and distribute previews without needing Xcode or Android Studio. This reduces friction in development and speeds up release cycles.

PWAs update instantly, with no user action required. As soon as new code is deployed, every user receives the latest version through the browser. This makes PWAs extremely lightweight and easy to maintain — no app store approvals, no binary builds, and no installation steps.

Development costs

React Native reduces costs by sharing a single codebase across iOS and Android, but some native modules may require platform-specific development.

PWAs are typically the most cost-effective solution because they run on the web and do not require separate mobile builds. Development and maintenance are significantly cheaper—ideal for startups, MVPs or businesses with smaller budgets.

SEO and marketing impact

React Native apps are not indexed by search engines and require separate marketing channels to drive downloads. Marketing in mobile stores relies on App Store Optimization (ASO) — optimizing the app’s name, keywords, screenshots and descriptions to improve discoverability. A common strategy is using descriptive titles (e.g., “Brand – Food Delivery” or “Brand: Meditation & Sleep”), which helps users understand the app instantly and improves search ranking within the store. Ratings, reviews and visual assets also play a major role in attracting downloads.

PWAs can be fully indexed by Google, improving visibility through SEO. They support link sharing, instant access and removing friction from onboarding, making them powerful marketing tools for content-driven or e-commerce businesses.

Distribution (App Store / Google Play vs browser access)

React Native apps must be published through Google Play and the App Store. This adds credibility but requires meeting store guidelines, passing reviews and handling update cycles.

PWAs are accessible instantly through a URL—no installation, no approval processes and no store fees. This dramatically lowers entry barriers and increases reach, especially in global markets or low-bandwidth environments.

Comparison Table

Category React Native PWA
User Experience (UX) Near-native look & feel with smooth animations and gestures App-like, but limited by browser rendering and DOM performance
Performance High performance thanks to native components Fast loading, but runtime limited by browser engine
Offline Capabilities Full offline support with native storage and sync Offline support via service workers and cached content
Access to Device Features Full access to camera, GPS, Bluetooth, haptics, file system, sensors, etc. Partial access, limited by browser APIs (especially on iOS)
Updates & Maintenance Requires store updates, but tools like Expo enable OTA updates and easy builds Instant updates — deployed like a standard website
Development Costs Medium — single codebase for iOS/Android, occasional native modules Low — one web app for all platforms
SEO & Marketing Not indexable by search engines, requires app store presence Fully indexable; strong SEO potential and instant link sharing
Distribution Via App Store & Google Play, requires review and publishing process Distributed via URL, no store approval or installation needed
Scalability Excellent for long-term, feature-rich mobile products Excellent for broad reach, limited for advanced native features

Which technology should you choose?

Choosing between React Native and a PWA ultimately depends on your product’s goals, technical requirements and the stage of your business. Both approaches offer strong benefits — but they shine in very different scenarios.

Choose React Native if:

  • You need high-performance mobile apps with smooth animations and native interactions.
  • Your product relies on advanced hardware features like Bluetooth, biometrics, background location, haptics, or complex camera use.
  • You want to build a scalable long-term mobile product with the potential for deep native integrations.
  • You expect users to spend a lot of time in the app (social apps, fintech, productivity tools, communication platforms).
  • You’re ready to distribute through App Store and Google Play and benefit from their credibility.

React Native is usually the better choice for feature-rich, interactive and high-performance applications that must feel truly native on both platforms.

Choose a PWA if:

  • You need the fastest possible time-to-market and want to keep costs low.
  • Your audience benefits from instant access via URL, with no installation barriers.
  • SEO matters — for example, e-commerce, content platforms or local services.
  • Your product doesn’t require the deepest native capabilities.
  • You want to reach the broadest possible audience, including older devices or slow networks.
  • You prefer web-like deployment: instant updates, no store approvals, no binary builds.

PWAs are ideal for lightweight apps, early-stage MVPs, and businesses that rely on reach, accessibility and frictionless onboarding.

Conclusion

React Native and PWA offer powerful capabilities for delivering mobile experiences, but they serve different needs. React Native provides near-native performance, deep device integration, and a well-crafted user experience, making it ideal for long-term, feature-rich mobile products. PWAs, on the other hand, stands out for its accessibility, speed of development, and broad reach, offering instant access and significant SEO benefits.

The “right” choice depends on your business goals: whether your priority is performance and native capabilities, or reach and rapid delivery. In many cases, starting with a PWA and evolving to a React Native app after product development can provide the best balance between cost, speed, and scalability.

Both technologies are mature, widely used, and capable of supporting successful digital products—the key is to tailor them to your users’ needs and product vision.

If you are looking for a team which can assist you with mobile app development do not hesitate to reach out to click5 for a consultation. We have experienced team of mobile developers working with React Native and PWA apps.

Web Vitals: Understanding Lighthouse, PageSpeed Insights, and Why Your Scores Fluctuate

Friday, November 28th, 2025

What Are Core Web Vitals?

Core Web Vitals are more than just technical metrics. Each one reflects how visitors feel when they land on your site, scroll, click, type, and wait for things to happen. Whether you are running an online store, a blog, a news site, or a SaaS product, these vitals influence how easily users can navigate your content and how likely they are to convert.

Google’s current Core Web Vitals set consists of Largest Contentful Paint (LCP), Interaction to Next Paint (INP) (which has officially replaced First Input Delay (FID)), and Cumulative Layout Shift (CLS). Together, they cover three key aspects of user experience: loading, responsiveness, and visual stability.

Largest Contentful Paint (LCP):  Measuring Loading Performance

Largest Contentful Paint describes how quickly the main content of a page appears on the screen. In practical terms, it answers the question of how long a user has to wait before the most important element, such as a hero image or a headline, is visible and readable.

A good LCP score is 2.5 seconds or less.

This metric is heavily influenced by server response times, how well images are optimized, the presence of render blocking scripts, and how you use lazy loading. When these parts of the stack are slow or misconfigured, the primary content takes longer to show up, even if the rest of the page structure is already in place.

Lighthouse and PageSpeed Insights continue to highlight LCP as one of the most important measures of perceived performance. A slow LCP usually signals that visitors are staring at a nearly empty or incomplete page while they wait for the most meaningful content to render. That moment of waiting can create frustration before the user has even had a chance to interact with the site.

Interaction to Next Paint (INP):  The New Standard for Responsiveness

First Input Delay has been retired in favor of Interaction to Next Paint, and INP is now the main responsiveness metric in modern performance audits.

INP measures the time between a user action and the moment the interface visually responds. It looks at interactions such as clicking a button, opening a menu, or typing into a form, and then tracks how long it takes for the browser to present the corresponding visual update.

A good INP score is under 200 milliseconds.

Unlike FID, which focuses only on the first interaction, INP considers interactions throughout the entire page visit and pays particular attention to the worst ones. This makes it a far more realistic indicator of how responsive a site feels during real use. Instead of only optimizing for the first click after load, teams must now think about responsiveness across the whole journey, from initial interaction through deeper navigation and repeated actions.

This shift reflects a broader move toward truly user centered metrics that match how people actually experience web pages, rather than metrics that only describe a brief moment around the initial page load.

Cumulative Layout Shift (CLS):  Ensuring Visual Stability

Cumulative Layout Shift measures how much visible content on a page moves around unexpectedly while the page is loading or updating. Most users have encountered this problem when they try to tap a button or a link and, at the last second, an ad or another element loads, pushing everything down so that the wrong element is clicked.

A good CLS score is below 0.1.

Sites that rely heavily on dynamic ad placements, auto loading widgets, or embedded media are particularly prone to layout shifts. Without careful design, elements may appear late, push other content out of place, or resize in ways that surprise the user.

Consistent optimization of CLS, such as reserving space for images and ads, avoiding inserting new content above existing content, and handling fonts and animations carefully, creates a more stable and predictable experience for visitors. Stable layouts are easier to interact with, reduce misclicks, and signal to Google that the page maintains a reliable visual structure.

Why Web Vitals Still Matter for SEO

Web Vitals still matter for SEO because they are grounded in UX research, not arbitrary targets. For example, keeping Largest Contentful Paint (LCP) under 2.5 seconds for at least 75% of page loads is tied to when users generally perceive a page as “loaded enough” to start their task.

Analysis of millions of page impressions shows that when sites meet the Core Web Vitals “good” thresholds, users are about 24% less likely to abandon page loads, with similar reductions on news and shopping sites specifically.

Those lower abandonment rates translate into more completed visits, more conversions, and stronger engagement signals, which Google’s ranking systems are designed to reward. Official documentation on Core Web Vitals states that achieving good scores supports success in Search and aligns with what core ranking systems “seek to reward.”

In short, Web Vitals link concrete thresholds like LCP ≤ 2.5s, INP ≤ 200ms, and CLS ≤ 0.1 at the 75th percentile to measurable gains in user retention and business outcomes, which in turn support better organic visibility.

Introducing Lighthouse and PageSpeed Insights

Lighthouse

Lighthouse is an open source auditing tool from Google that checks how a single page performs across performance, accessibility, best practices and SEO. You give it a URL, Lighthouse loads the page in a controlled environment, runs a series of audits, then scores how well the page did and explains what is slowing things down or hurting quality. The official docs describe it as an automated way to improve the overall quality of web pages, with support for both public and authenticated sites.

The easiest way to use Lighthouse is inside Chrome DevTools.

  1. Open the page you want to test
  2. Open DevTools (F12)
  3. Switch to the Lighthouse panel
  4. Pick mobile or desktop and select the categories you care about
  5. Start the audit by clicking Analyze page load

Lighthouse spins up a special Chrome session, simulates device and network conditions, records a trace of a single page load and then generates a report. At the top you see a 0 to 100 score for each category, followed by metrics such as Largest Contentful Paint, Cumulative Layout Shift and Total Blocking Time, plus screenshots and a list of passed and failed audits with links to documentation on how to fix each issue.

Summary of the Lighthouse test

Lighthouse reports are based entirely on lab data from that one synthetic run rather than long term user history. During the audit it applies network and CPU throttling to emulate realistic but repeatable conditions, for example simulating a mid range mobile device on a slower connection when you choose the mobile mode. From the captured trace it calculates timing and layout metrics and feeds them into a scoring model that blends several metrics into the overall Performance score. This makes Lighthouse a reliable way to test changes during development and to catch regressions before they reach users.

Beyond DevTools you can run Lighthouse in several other ways. There is a Node based command line interface that you install with npm, which is ideal for scripting and continuous integration.

How to Install and Use It

You typically install it globally on your system to run it easily from any directory:

Installation:
npm install -g lighthouse

Usage:
lighthouse

For example, to audit Google’s homepage:
lighthouse https://www.google.com

This will run the audit and output the results directly to your terminal or generate an HTML report file, depending on the flags you use.

The same engine is available as a Node module if you want to integrate it directly into build tools, and there is also a Chrome extension you can install from the Chrome Web Store that lets you trigger audits from the browser toolbar.

PageSpeed Insights

PageSpeed Insights is a web based service that measures how a page performs on mobile and desktop and gives recommendations for improvement. It uses Lighthouse for its lab tests and combines that with real user data from the Chrome UX Report, so you see both synthetic and field performance for Core Web Vitals in one place.

When you open PageSpeed Insights at https://pagespeed.web.dev/ and run an analysis, the first thing you see is the choice between mobile and desktop tabs at the top of the report. Each tab shows the same structure for that device type. The page is then split into two main sections: a user experience section based on real users and a diagnostic section based on a single synthetic test.

The first, upper section is the field data box. It is labeled as real user experiences and is powered by the Chrome UX Report. This data aggregates visits from many real Chrome users over a rolling 28 day window and shows how they experienced your page and, if available, your entire origin. The key numbers here are the Core Web Vitals at the top: LCP, INP and CLS, followed by other metrics like First Contentful Paint and Time to First Byte. All values are shown at roughly the 75th percentile, and you can switch between URL level data and origin level data when both exist. If there is not enough traffic for a specific URL, PSI falls back to origin data. This field section is the same CrUX data Google uses when it evaluates Core Web Vitals for rankings.

The second, lower section is the lab data box. It is labeled as a Lighthouse diagnosis and is based on a single run of the Lighthouse engine against your page. PSI loads your URL on Google controlled infrastructure under fixed, throttled conditions that simulate a specific mobile or desktop profile and records metrics like LCP, INP and CLS in that controlled environment. This synthetic run is what produces the familiar performance score and the list of opportunities and diagnostics. Because it is just one emulated page load, the values often differ from the averages in the field data above, which come from many real users on many networks and devices. Lab data is ideal for debugging and for testing experiments, while field data is the source of truth for how users and Google actually experience your site.

When you click Analyze, both sections are prepared at once. PageSpeed Insights first queries the Chrome UX Report to retrieve the latest 28 day aggregation for the tested URL and its origin. At the same time, it runs a fresh Lighthouse audit in real time to generate the lab report. The result is a single page where the top half shows how fast the page feels for real users over time and the bottom half shows what a single, standardized test run sees and how you can improve it.

When to Rely on Lighthouse vs PageSpeed Insights

Lighthouse and PageSpeed Insights use the same engine for lab tests, but they answer slightly different questions. Lighthouse focuses on one controlled page load so you can debug, iterate and guard deployments. PageSpeed Insights combines that same lab run with 28 days of real-user data from the Chrome UX Report (CrUX), making it better for understanding how your site actually behaves in the wild and how Google sees your Core Web Vitals.

Aspect Lighthouse PageSpeed Insights
Data source Pure lab data from a single synthetic run in a controlled environment (emulated device + throttled network). Field + lab: CrUX real-user data at the top, Lighthouse lab run below.
What it’s best at Debugging and regression testing: seeing how code changes affect metrics under repeatable conditions. Monitoring real-world experience: seeing if a page passes Core Web Vitals for actual users and how that changes over time.
Where you run it Chrome DevTools, CLI, CI pipelines, Node module, or extension. Ideal during development and pre-launch. Web UI at https://pagespeed.web.dev/ or via the PSI API, typically used on staging and production URLs.
Metrics focus Full audit categories (Performance, Accessibility, Best Practices, SEO). Performance score blends LCP, INP proxy, CLS and other metrics from the trace. Core Web Vitals and performance for real users (LCP, INP, CLS from CrUX) plus one Lighthouse run for diagnostics.
How often data changes Every run can differ slightly because it is a fresh synthetic test; no historical memory unless you store results yourself. Field data updates daily as a rolling 28-day window, so changes appear gradually and reflect traffic mix shifts.
Who typically uses it Developers and engineers iterating on code, setting performance budgets, and catching regressions before release. SEO specialists, product owners and performance teams checking if key pages meet Core Web Vitals and how Google’s page experience view is evolving.
When to rely on it When you are building or changing the site: local dev, pull requests, staging, CI gates, “what happens if I change X?” questions. When you are evaluating live experience and SEO impact: “are we passing CWV?”, “did that redesign help users?”, “how does this URL compare over time?”

Why Your Scores Fluctuate

Core Web Vitals scores are not static. Even if you do not change a single line of code, numbers in Lighthouse and PageSpeed Insights will move around from run to run and day to day. This is expected, because both tools sit on top of a web stack that is constantly influenced by devices, browsers, connections, geography and traffic patterns. Google’s own docs and community threads note that performance scores are inherently variable and that small changes between runs are normal.

Every test is a snapshot of a moment in time. On that specific run, your page is loaded on a particular device, in a particular browser, from a particular location, over a particular connection. Change any of these and timings shift.

Device performance

Real users hit your site on everything from low-end phones to high-end desktops, and weaker devices run JavaScript and rendering more slowly, which worsens LCP and INP. Chrome UX Report and Search Console both split Core Web Vitals by device type (mobile vs desktop), highlighting that hardware differences and mobile-heavy audiences often lead to slower, less stable scores.

Browser and rendering engine changes

As Chrome and other browsers roll out new versions, they change how they schedule tasks, lay out pages, and decode images. That can make some pages slightly faster or slower between versions, even if you never touch your code. Google’s Core Web Vitals report documentation explicitly notes that a “widely-adopted browser version update” can shift your status because performance is based on actual usage data, not a fixed baseline.

Network variability

Lighthouse’s own docs explain that performance scores naturally fluctuate because of “inherent variability in web and network technologies,” even when the page itself is unchanged. Spikes in latency, brief packet loss, routing hiccups, or congested mobile networks all slow down TTFB and resource downloads, which in turn worsens metrics like LCP and INP for that particular run or group of users.

Geography and routing

A user close to your data center or CDN edge usually sees much faster TTFB and LCP than someone reaching your site from another continent, over more network hops and higher latency links. Lab tests often run from a single region, but field data in CrUX aggregates users worldwide, so regions that are far from your servers or poorly peered with your CDN can pull real-world metrics down even when local lab tests look good. Guides on lab vs field data and RUM specifically call out geography, routing and CDN edge placement as key reasons why real-user Core Web Vitals differ from synthetic tests.

Traffic mix and user behavior

Your audience is not fixed. Campaigns, seasonality or viral spikes can shift your traffic toward users on slower networks or weaker devices, which lowers the share of “good” Core Web Vitals in CrUX even if your code did not change. Core Web Vitals in Search Console and CrUX are explicitly based on all eligible real user visits over a rolling 28-day window, so any change in who is visiting (device type, connection quality, geography) will change the aggregated metrics you see.

Caching, CDNs, and content variability

Caching decides whether a user gets a “freshly cooked” page or a “preheated” one. A cold cache means the page or asset is not stored yet: the request has to hit your origin server, run application code, query databases, maybe resize images, and then send the response. Those first few hits are usually slower and can hurt LCP. A warm cache means the CDN or browser already has a ready-made copy, so it can return HTML, CSS, JS or images much faster, often from a nearby edge server. CDN and RUM guides point out that cache warm-up after a deploy, cache expirations, or aggressive purges can cause temporary drops in Core Web Vitals until traffic re-warms the cache. Differences between CDN edge locations and their local load add another layer of variation. On top of this, content variability (A/B tests, different hero images, personalized blocks, rotating ads) means some visitors get heavier pages or slower third-party responses than others, so their individual LCP and CLS are worse even though the URL is the same. Over a 28-day CrUX window, that mix of cold vs warm cache hits, different edges, and different content variants shows up as natural wobble in your field data.

Why Lighthouse Mobile Performance Scores Are Lower than Desktop

Google Lighthouse uses different testing profiles for mobile and desktop, which largely explains why mobile performance scores are often significantly lower. The mobile profile simulates a typical mid-range smartphone on a slow network, whereas the desktop profile assumes a high-performance machine on a fast connection. In practice, this means:

CPU Throttling: The mobile test applies ~4× CPU slowdown to emulate a ~$200 Android phone (e.g. a Moto G4). This reduced processing power makes JavaScript execution, HTML/CSS parsing, and rendering slower on mobile.

Network Throttling: The mobile test uses a “Slow 4G” network profile (roughly 150 ms latency, ~1.6 Mbps download, 750 Kbps upload). This high-latency, low-bandwidth connection means content (HTML, CSS, images, etc.) downloads much more slowly than on desktop’s unthrottled broadband.

Device Emulation: Lighthouse mobile emulates a smaller screen and touch device, but performance-wise the key differences are the throttled CPU and network. The desktop audit, by contrast, is run with no CPU or network throttling (assuming a wired connection).

Factors Affecting Mobile Performance Scores

Several technical factors contribute to slower Lighthouse scores on mobile. Many of these relate to how mobile devices handle the page load under Lighthouse’s throttling.

Limited CPU Power

The emulated mobile CPU is much slower, so tasks like JavaScript execution, style/layout calculations, and image decoding all take longer. A script that is trivial on desktop might clog the main thread on mobile, delaying paints. In fact, Lighthouse’s mobile CPU throttling causes CSS and JS files to “take ages to parse and execute,” greatly impacting FCP/LCP (CSS parsing in particular can delay rendering the first and largest content)

Slow Network Throughput

The 1.6 Mbps simulated download means large resources (images, scripts, styles) download slowly. High latency (150 ms RTT) adds extra delay for each request. This affects Time to First Byte (TTFB) and resource load times – a slow TTFB directly pushes FCP and LCP later. Every additional HTTP request or non-optimized asset hurts more under these conditions.

Page Weight & Assets

Mobile performance is very sensitive to the total page size and number of resources. Large images or video will significantly drag LCP on mobile due to longer transfer and decoding time. Likewise, heavy JavaScript bundles increase download time and CPU work (increasing Total Blocking Time and delaying interactivity). In short, pages that are “fast” on desktop often carry too much weight for a throttled mobile environment.

Render-Blocking Resources

Assets like CSS and JS that block rendering are especially detrimental on mobile. The browser must download and process these files before painting content. On a slow connection, multiple or oversized CSS/JS files can delay the first render by seconds. This “render-blocking” effectreduces the FCP considerably”, and by extension can delay LCP if the largest element is also waiting on these files. Mobile devices amplify this problem because parsing the CSS/JS is slower, so the blocking time is longer.

Client-Side Rendering delays

Many modern sites rely on heavy client-side rendering (for example, loading a blank page and then populating content via large JS frameworks). On mobile, this approach is costly – the device must execute a lot of script before content appears. Thus, if the page relies on JS to display main content, FCP/LCP will be much slower on mobile. A desktop might handle a 2 MB React bundle quickly, but a mid-tier phone struggles, leaving users staring at a blank or half-loaded page for much longer.

Third-Party Scripts

Analytics, ads, and other third-party scripts can insert network requests and CPU overhead. Under mobile throttling, these can significantly delay paints (for example, an analytics script that blocks the main thread or a third-party font that blocks text rendering will hurt mobile FCP/LCP far more than desktop).

To summarize the above factors, the table below highlights how each one impacts Lighthouse mobile scores:

Factor Impact on Mobile Lighthouse Performance
CPU Performance Mobile profile uses a throttled, low-powered CPU. Script execution and rendering tasks take longer, increasing times for FCP/LCP. Even parsing CSS/JS can significantly lag on a slower CPU, delaying content rendering.
Network Speed & Latency Simulated Slow 4G network (≈150 ms RTT, 1.6 Mbps) means each resource download is slow. High latency also lengthens TTFB and handshake times. This pushes back FCP (no bytes = nothing to render) and delays loading of images/styles needed for LCP.
Page Weight (Assets) Large page resources (images, videos, scripts) take much longer to transfer and process on mobile. A big hero image or bloated JS bundle that a desktop loads in 1 s might take 5–10 s on mobile, directly worsening LCP and other metrics.
Render-Blocking Content Mobile browsers must wait for critical CSS and synchronous JS to load/execute before painting. Under throttling, unoptimized CSS/JS can block the first content for a long time. This greatly slows FCP, since the browser may be idling until these files are ready.
Client-Side Rendering If a page relies on heavy client-side JS to construct content (SPA frameworks, etc.), a throttled mobile CPU will delay the content render. FCP is pushed back until initial scripts run, and LCP is delayed until the JS inserts the largest content.
Third-Party Scripts Excess third-party scripts (ads, analytics, widgets) add network requests and execution overhead. On mobile, these often load on slower connections and run on the main thread, contributing to longer Total Blocking Time and possibly interfering with timely paints.

Each of these factors disproportionately affects the mobile test. The result is that mobile Lighthouse exposes performance issues (slow server responses, unoptimized assets, render-blocking patterns, etc.) that might be masked on desktop. It is by design – Google wants developers to optimize for the tougher conditions that many real mobile users face.

Conclusion

The temptation is to chase perfect scores, but the real goal of Web Vitals is consistent, predictable user experience. Slightly fluctuating numbers around a healthy range are normal and acceptable. Users care far more about whether your page usually feels fast, stable and responsive than whether it scores ninety two or ninety five on a synthetic test.

By understanding why scores move, focusing on trends instead of single runs and using Lighthouse and PageSpeed Insights for what each does best, you can treat Web Vitals as a practical quality signal rather than a stressful scoreboard. The objective is not perfection on every test. It is building a site that feels reliably smooth for real people, which in turn supports stronger engagement, better conversions and more durable search performance.

If you are looking for a team which can assist you with WordPress website optimization do not hesitate to contact click5. We have experience and tools to make your website page load times lighting fast.

Understanding n8n: The Open-Source Workflow Automation Platform

Friday, November 14th, 2025

This open-source workflow automation tool has captured the attention of developers, technical teams, and forward-thinking organizations worldwide, boasting over 230,000 active users and ranking among the top 150 GitHub projects of all time. But what exactly is n8n, and why should you consider it for your automation needs?

What is n8n, and why is it worth learning?

n8n (pronounced “n-eight-n”) is an open-source workflow automation platform that allows users to connect various applications, services, and APIs to create sophisticated automated workflows. Unlike traditional automation tools that operate as black boxes, n8n provides complete transparency and control over your automation processes.

The platform operates under a fair-code license, meaning the core features remain source-available and free for individuals and certain usage scenarios, while premium enterprise features are available through paid plans. This approach has fostered a vibrant community that continuously contributes to the platform’s development, resulting in exponential growth with the community node ecosystem.

What makes n8n stand out is its powerful node-based architecture paired with the freedom to integrate custom logic. Each node represents a specific function—whether it’s an API call, data transformation, or workflow control—allowing users to visually design complex automation’s step by step. When visual tools aren’t enough, developers can seamlessly extend workflows by writing custom JavaScript or Python directly within the platform. This unique blend of no-code accessibility and full-code flexibility empowers both non-technical users and engineering teams to build, adapt, and scale automations without switching tools.

Pricing of n8n Cloud Version

Core Architecture and Components

Core n8n Architecture
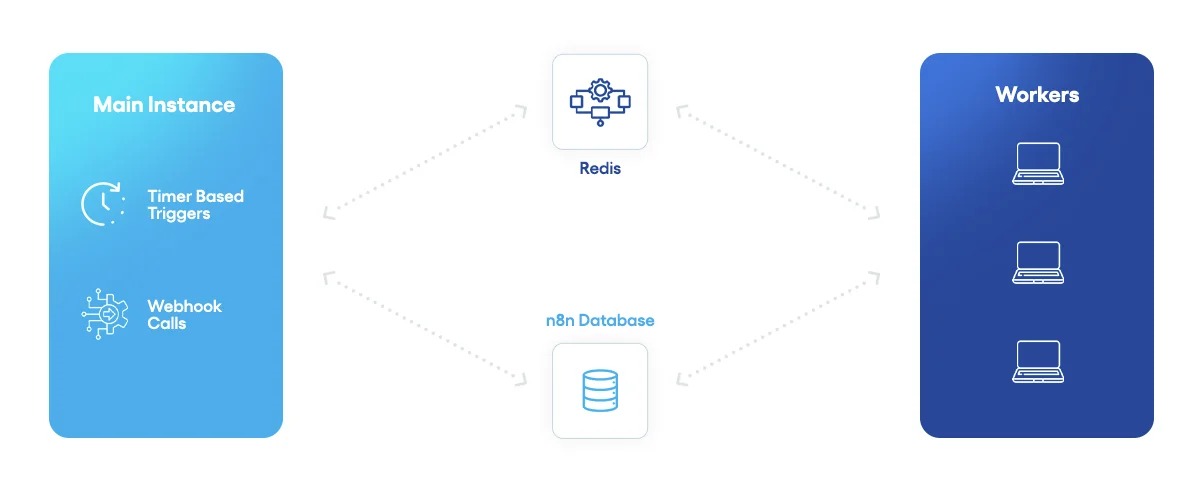
Understanding n8n’s architecture provides insight into its power and flexibility. The platform consists of several interconnected components working in harmony:

The visual workflow editor serves as the primary interface where users design automation workflows by dragging and dropping nodes onto a canvas. This intuitive visual representation resembles a flowchart, making complex logic easier to understand and manage. The editor converts your visual workflow into a JSON definition that gets stored in the database and executed by the backend engine.

At the core of n8n is its node-based system. Each node represents a single operation within a workflow, such as an API call, data transformation, or email action. There are two main types: Trigger nodes, which start workflows based on events like webhooks, schedules, or manual runs, and Regular nodes, which handle the actions themselves. With 400+ built-in nodes and a growing library of community extensions, n8n provides broad integration possibilities.

The workflow execution engine drives the automation process. It loads workflow definitions, executes tasks node by node, and passes data between them. The engine manages logging, error handling, and data transformations to ensure reliability even for complex workflows.

For data persistence, n8n uses SQLite by default for development, but recommends PostgreSQL or MySQL/MariaDB in production. The database stores workflow definitions, credentials, logs, and user data when authentication is enabled. (Multi-user management and team collaboration features are part of the paid plan.)

Finally, n8n offers a REST API for programmatic access—allowing you to create, trigger, or retrieve workflows and execution data. This makes n8n suitable both as a standalone automation tool and as an embedded component within larger systems. (The full API and advanced access controls are available in paid tiers.)

n8n Advanced Workflow Automation Logic

n8n supports advanced workflow logic, including conditional branching with IF and Switch nodes, loops for processing multiple items, parallel execution for improved performance, and sophisticated error handling mechanisms. These features enable the creation of workflows that can handle real-world complexity and edge cases.

Perhaps most exciting is n8n’s AI and LLM integration capabilities. The platform has positioned itself as “AI-native” with nearly 70 nodes dedicated to AI applications. n8n integrates seamlessly with OpenAI, Anthropic, and other AI providers, enabling users to build RAG (Retrieval-Augmented Generation) systems, autonomous AI agents capable of tool use and decision-making, and sentiment analysis and text classification workflows.

The platform’s AI Agents functionality represents a significant advancement, allowing users to create autonomous systems that perceive information, make intelligent decisions, and take actions to achieve specific goals. Unlike simple chatbots or linear workflows, AI agents in n8n can dynamically select tools, maintain conversation context, and adapt their behavior based on outcomes.

n8n Workflow Example

n8n vs. Competitors

When comparing n8n to established players like Zapier and Make, several distinctive differences emerge. While Zapier dominates with over 6,000 integrations and Make offers 1,500+, n8n’s 400+ integrations, coupled with unlimited custom API connections, provide sufficient coverage for most use cases.

The most significant differentiator lies in pricing philosophy. Traditional platforms charge per individual operation or task, meaning every action within a workflow consumes your quota. n8n’s execution-based pricing charges only for complete workflow runs, regardless of how many operations occur within that workflow. This model means a workflow with 100 operations counts the same as one with 10 operations—a single execution. For complex workflows, this can translate to cost savings of 90% or more compared to competitors.

Consider this example: running workflows with approximately 100,000 tasks could cost over $500 monthly on operation-based platforms. On n8n’s Pro plan, the same workload costs around $50, as charges only increase with execution count, not workflow complexity.

n8n’s open-source foundation provides advantages unavailable in proprietary tools. Users can inspect the source code, contribute improvements, create custom nodes without restrictions, and deploy on their own infrastructure with no vendor lock-in. This transparency and flexibility appeal particularly to technical teams who value control over their automation stack.

However, Zapier and Make offer advantages in certain areas. Zapier’s massive integration library and user-friendly interface make it ideal for non-technical users seeking a quick automation setup. Make provides a middle ground with more advanced features than Zapier while maintaining better accessibility than n8n.

n8n vs. Zapier vs. Make Comparison Chart

Feature n8n Zapier Make
Starting Price (Monthly) Free (self-hosted) / $24/month (cloud) $19.99/month (after free tier) $10.59/month
Free Plan Yes (self-hosted unlimited) Yes (100 tasks/month) Yes (1,000 operations/month)
Pricing Model Execution-based Task-based Operation-based
Number of Integrations 400+ native integrations (expandable via community and custom nodes) 8000+ 3000+
Self-Hosting Option Yes (Docker, VPS) No No
Custom Code Support JavaScript, Python (full support) Limited (Code by Zapier snippets) JavaScript (Enterprise plan only)
Visual Workflow Builder Node-based canvas Linear trigger-action model Visual drag-and-drop flowchart
Learning Curve Steep (technical background helpful) Easy (beginner-friendly) Moderate
AI Integration Advanced (LangChain, custom AI models) Basic (ChatGPT, OpenAI integrations) Good (OpenAI, Claude, Hugging Face)
Error Handling Advanced custom error handling Basic retries and notifications Robust with alternative pathways
Execution Speed Fast (self-hosted can be optimized) Reliable, consistent (1-15 min) Fast for complex workflows
Data Privacy Control Full control (self-hosted) Limited (cloud-only) Limited (cloud-only)
Security & Compliance DIY (depends on deployment) SOC 2 Type II, GDPR, CCPA compliant GDPR compliant, European data centers
Mobile App No No Yes
Community & Support Active community, forum support Extensive docs, large user base Good documentation, Make academy courses
Best For Developers, technical teams, complex workflows Non-technical users, simple automations Visual thinkers, medium complexity workflows

Who should use n8n?

n8n shines for specific user profiles and organizational contexts. Technical teams and developers find n8n ideal due to its code-friendly approach, extensibility through custom nodes, Git integration for version control, and API-first architecture. Development teams appreciate that n8n doesn’t force them into a no-code straightjacket but rather provides the flexibility to drop into code when needed.

  • Cost-conscious businesses, particularly startups and SMB’s, benefit from n8n’s free Community Edition, execution-based pricing that scales affordably, and elimination of per-operation charges that can quickly escalate. For companies running complex workflows at volume, n8n can reduce automation costs by 80-90% compared to traditional platforms.​
  • Organizations prioritizing data privacy, such as those in healthcare, finance, or the government sectors, value n8n’s self-hosting capability that keeps sensitive data on-premise, compliance with strict data residency requirements, and complete transparency into data handling. When regulatory requirements prohibit sending data to third-party SaaS platforms, n8n provides a compliant alternative.
  • Companies needing complex automation benefit from n8n’s advanced workflow logic, parallel execution capabilities, sophisticated error handling, and integration with custom APIs and internal systems. When business processes involve intricate conditional logic, data transformations, or integration with proprietary systems, n8n’s flexibility becomes essential.

Deployment Options

n8n offers flexible deployment options to match different organizational needs and technical capabilities. Self-hosted deployment remains the most popular approach, providing maximum control and cost efficiency.​

Docker Containers

Common self-hosting methods include Docker containers, which offer the simplest deployment path with pre-configured images available. Many users deploy n8n on VPS providers like DigitalOcean, Hetzner, or Contabo, with costs starting as low as $5-10 monthly for small workloads. Platform-as-a-Service options like Railway provide one-click deployment templates that handle infrastructure complexity while remaining cost-effective. For production environments requiring high availability, n8n supports Kubernetes deployments with horizontal scaling.​​

Queue Mode Deployment

For improved performance and scalability, n8n offers queue mode deployment where you have multiple n8n instances set up, with one main instance receiving workflow information (such as triggers) and the worker instances performing the executions. This architecture leverages Redis for job queue management, enables horizontal scaling by adding worker instances, and provides better resource utilization and fault isolation. Queue mode is essential for enterprises running hundreds of workflows simultaneously.​

Queue mode architecture

Organizations preferring to avoid self-hosting complexity can use n8n Cloud, the official hosted service offering managed infrastructure, automatic updates, built-in redundancy and backups, and simplified setup without server management. Cloud plans start at $20 monthly for 2,500 workflow executions.

Integrations

n8n integrations are called nodes. There are three types of nodes:

  • Built-in nodes
  • Community nodes
  • Custom nodes (write in a declarative or programmatic way)

Built-in Nodes

Built-in nodes form the core infrastructure of n8n and represent officially maintained integrations developed and supported by the n8n core team. These nodes encompass trigger nodes that initiate workflows based on events or schedules, regular nodes that perform tasks and interact with external services, logic nodes that control workflow branching through conditional statements, and specialized nodes for error handling and data transformation.

Built-in nodes cover hundreds of popular services, including Slack, Google Sheets, Salesforce, HTTP Request, and many others, providing pre-configured connections with proper authentication methods and comprehensive operation sets. The primary advantage of built-in nodes is their reliability, compatibility assurance across n8n versions, and extensive documentation—they’ve been battle-tested by thousands of users, which reduces debugging complexity and development time.

Community Nodes

If you can’t find a built-in node for your integration, you can search for a community node. Community nodes are user-developed integrations published to the npm registry and maintained by volunteers within the n8n ecosystem, available for installation through n8n’s GUI, npm CLI, or within Docker containers. These nodes expand n8n’s reach into specialized services and emerging platforms that haven’t yet received official support, allowing developers to share innovative solutions across teams and enterprises.

The advantages of community nodes include access to cutting-edge integrations, lower barriers to entry for independent developers seeking to contribute to the platform, and the ability to leverage specialized functionality created by domain experts. Community nodes also follow proper npm packaging standards, making them easy to distribute and version across organizations.

The trade-offs are that maintenance and support quality varies significantly—some community nodes are actively maintained while others become stale, potentially breaking with n8n updates. Additionally, there are security considerations since not all community nodes receive the same vetting as built-in nodes, though n8n does maintain a verification system to distinguish trusted contributors. Community node always has npm package name in convention: n8n-nodes- or for company-scoped package: @/n8n-nodes-.


Installation process of the community node in the n8n UI

If there are no built-in or community nodes which are reaching the integration provider you need, you can always write your own node.

Custom Nodes

Custom nodes allow developers to build proprietary integrations using either declarative (JSON-based) or programmatic (TypeScript code-based) approaches, providing ultimate flexibility for unique business requirements. The declarative style uses JSON configuration to define node properties, inputs, outputs, and operations, making it simpler, less prone to bugs, and more maintainable for REST API-based integrations—this approach is recommended for most new nodes and significantly reduces boilerplate code.

The programmatic style provides complete control through TypeScript’s execute() method, offering maximum flexibility for complex logic, custom authentication patterns, and scenarios where declarative definitions fall short; however, it requires more development expertise and introduces higher maintenance overhead. Custom nodes encourage modular design patterns that improve code reusability, enable proper version control through Git, and can be published to npm for team-wide or public distribution.

The primary advantages are unlimited customization possibilities and the ability to encapsulate business-specific logic into reusable components that integrate seamlessly with workflows. The disadvantages include longer initial development time, TypeScript and n8n framework knowledge requirements, testing complexity, and ongoing maintenance responsibilities—complex custom nodes with many dependencies can become difficult to debug and maintain at scale.

Custom nodes are most valuable when you have proprietary integrations, require specialized data transformations not available in built-in nodes, or need to standardize repetitive integration patterns across multiple workflows. More about developing custom n8n nodes, you can read in our article – Introduction to Custom n8n Nodes Development.

Frequently Asked Questions

What is n8n?

n8n is an open source workflow automation platform that enables businesses and developers to visually connect apps, APIs, databases, and services to build automated processes. It offers flexibility to run workflows in the cloud, self host, or locally, while maintaining full control over data and execution logic.

How is n8n different from other automation tools like Zapier or Make?

Unlike SaaS-only automation platforms, n8n provides an open and extensible architecture. Users can create fully customized nodes, integrate proprietary systems, execute JavaScript inside workflows, and deploy automations on infrastructure they manage. This makes n8n better suited for organizations with security, data residency, or deep customization requirements.

Do I need to code to use n8n?

No. The core experience is built around a drag and drop, no code interface. However, n8n also supports custom code execution, API calls, conditional logic, and function nodes, meaning technical users can add code where precision automation demands it.

What are n8n nodes?

Nodes are modular automation building blocks that define actions within a workflow. Examples include sending emails, querying a database, calling an API, transforming data, triggering webhooks, or communicating with third-party applications. Each node performs a specific operation and passes output to the next step.

What type of systems can n8n connect to?

n8n integrates with a wide range of services including CRMs, payment gateways, ERPs, databases, analytics tools, communication platforms, AI models, cloud storage, internal APIs, HTTP endpoints, and custom business systems through community or user-built nodes.

Is n8n secure?

Security depends on the deployment approach. Because n8n can run on infrastructure fully controlled by the user, teams can enforce network isolation, encryption, identity access rules, VPN usage, internal firewalls, and compliance policies. No data needs to leave your environment if hosted privately.

Can n8n handle complex multi step workflows?

Yes. n8n supports sequences with branching logic, merges, loops, error handling, waits, conditional routing, dependency chaining, code injection, and parallel execution. This makes it highly capable for designing enterprise-grade automations rather than simple one-to-one triggers.

How can businesses use n8n for automation?

Common n8n use cases include:

  • Syncing data between internal and external systems
  • Automating lead routing and CRM updates
  • Managing payment workflows and order fulfillment
  • Executing AI operations (summarization, classification, generation)
  • Alerting systems and operations triggers
  • Automating support ticket creation and updates
  • Internal process orchestration across tools and databases

Conclusion – n8n Automation Without Limits

n8n represents a paradigm shift in workflow automation, challenging the proprietary, pay-per-task model that has dominated the industry. Its open-source foundation, execution-based pricing, and developer-friendly approach have resonated strongly with technical teams, evidenced by explosive growth to over 230,000 active users and a 5x ARR increase in the past year.​

The platform occupies a unique position in the automation landscape—more flexible and cost-effective than Zapier, more technically capable than Make, and truly customizable in ways proprietary platforms cannot match. For organizations willing to invest in technical setup and maintenance, n8n offers unparalleled value, control, and scalability.

Looking forward, n8n’s trajectory appears exceptionally promising. The platform’s AI-native approach positions it well for the coming wave of AI-driven automation, while the thriving community ensures continuous innovation and expansion. As more organizations recognize the limitations and costs of traditional automation platforms, n8n’s proposition of “automation without limits” becomes increasingly compelling.​

Whether you’re a developer seeking complete control, a startup watching every dollar, or an enterprise requiring custom automation at scale, n8n deserves serious consideration. The platform proves that open-source tools can not only compete with but often surpass their commercial counterparts. In the evolving landscape of workflow automation, n8n has established itself not as an alternative but as the future—one where transparency, flexibility, and community-driven innovation define the standard.

Scale Faster with Smarter Workflows

If you’re exploring n8n implementation, workflow automation design, custom n8n implementation, n8n node development, or scalable self-hosted deployments, an experienced engineering partner can accelerate development and reduce implementation risk.

Want to automate smarter? Reach out to a workflow automation specialist from click5 Team and discover what’s possible with n8n.

Migrating Google Cloud Projects between Organizations

Monday, April 24th, 2023

How To Guide to Migrating Google Cloud Projects between Organizations

In the past, migrating projects between accounts / organizations in Google Cloud was impossible and required assistance from their Enterprise Support team. Recently, Google made that process much simpler and it can be done without Google’s involvement, as long as you have proper access and permissions to both organizations, source and destination.

Migrating projects between organizations requires planning as it requires multiple steps which need to be coordinated between both GCP accounts / organizations. In this guide, we will explain a step-by-step process to migrate a project(s) from one Google Cloud Organization to another.

Preparation

In the effort of preparation for the project migration between different Organizations in Google Cloud, you will need to gather the following information.

In Google Cloud’s hierarchy, Projects are created under Organizations. You can also use a two-level hierarchy and assign Projects under Folders which are children of Organizations.

1. Project ID(s) of the project(s) you want to migrate

In order to locate ID(s) of the project(s) you want to migrate, navigate to the Welcome/Dashboard page of your Google Cloud Console account and click on the project selector in the top left corner, next to the Google Cloud logo. A modal window will open with a list of Organizations and Projects you have access to, with their respective Organization or Project IDs.

2. The source organization’s Organization ID

You can find your Organization ID following steps from the previous bullet point. Your Organization is listed along with your Projects, as seen on the screenshot above.

3. The destination organization’s Organization ID

You will have to ask the owner/administrator of the organization where you want to migrate your project(s) to, to send their Organization ID.

Assign user Permissions and configure organization Policies

As we gathered IDs of project(s) which we need to migrate, and IDs of the source and destination Organizations, you need to set up user permissions and policies as follows:

1. Assign permissions in the Source organization

You need a particular set of IAM permission roles to migrate project(s) between organizations in Google Cloud.

You can get the necessary permissions by acquiring the following roles:

  • Project Mover ( roles/resourcemanager.projectMover ) on the project you want to migrate or its parent resource.
  • Organization Policy Administrator ( roles/orgpolicy.policyAdmin ) on the parent organization resource.

In order to assign the necessary permissions, search for ‘iam and admin’ in the source organization’s Google Cloud Console account. Then click on the page labeled ‘IAM & Admin‘.

Click on the pencil icon next to the user you want to assign the permissions to, and select necessary roles, as seen on the screenshot below.

2. Assign permissions in the Destination organization

In the destination organization, you will need following permissions:

  • Project Creator ( roles/resourcemanager.projectCreator ) on the parent organization resource.
  • Project Billing Manager ( roles/billing.projectManager ) on the project you’ve migrated or its parent resource.
  • Organization Policy Administrator ( roles/orgpolicy.policyAdmin ) on the parent organization resource.


3. Configure organization Policies in the Source organization

To migrate a project to a new organization, you will also need specific set of permissions to create and manage organization policies.

  1. Open the Welcome / Dashboard page of the source organization’s Google Cloud Console account and search for ‘organization policies’. Then click on the page labeled ‘Organization policies (IAM and admin)‘.

  2. On the Organization policies page, click on the ‘Allowed Destinations for Exporting Resources’ option.

  3. Click on the ‘MANAGE POLICY’ button next to the ‘Policy for Allowed Destinations for Exporting Resources’ heading.
    Note: If you don’t see the ‘MANAGE POLICY’ button, it means you haven’t been assigned the ‘Organization Policy Administrator’ role in the source organization. Confirm if you have been assigned this role and try again.

  4. Select the ‘Customize’ radio button, and the ‘Merge with parent’. Then click on ‘ADD A RULE’. For the Policy values select ‘Custom’, and for the Policy type select ‘Allow’. In the Custom values section enter ‘ under:organizations/DESTINATION_ORGANIZATION_ID ’ and click ‘DONE’.

This will grant the permissions for your project to be exported to the destination organization.

4. Configure organization Policies in the Destination organization

In the destination organization, you will need following policies.

  1. Open the Welcome / Dashboard page of the destination organization’s Google Cloud Console account and search for ‘organization policies’. Then click on the page labeled ‘Organization policies (IAM and admin)‘.

  2. On the Organization policies page, click on the ‘Allowed Sources for Importing Resources’ option.

  3. Click on the ‘MANAGE POLICY’ button next to the ‘Policy for Allowed Sources for Importing Resources’ heading.
    Note: If you don’t see the ‘MANAGE POLICY’ option, it means you haven’t been assigned the ‘Organization Policy Administrator’ role in the destination organization. Confirm if you have been assigned this role and try again.

  4. Select the ‘Customize’ radio button, and the ‘Merge with parent’. Then click on ‘ADD A RULE’. For the Policy values select ‘Custom’, and for the Policy type select ‘Allow’. In the Custom values section enter ‘ under:organizations/SOURCE_ORGANIZATION_ID ’ and click ‘DONE’.

Change Billing Account for the migrated Project(s)

Google Cloud Billing accounts can be used across organization resources. Moving a project from one organization to another won’t impact billing, and charges will continue against the old billing account. However, if you have the proper permissions, you can migrate billing to a new account, by following these steps:

  1. Open the Welcome / Dashboard page of the source organization’s Google Cloud Console account and search for ‘billing’. Then click on the ‘Billing accounts‘ page.

  2. Switch to the ‘MY PROJECTS‘ tab of the Billing page. Then in the Actions menu for the relevant project, click on the ‘Change Billing‘ option.

  3. In the modal window, select the billing account of the destination organization and click on ‘SET ACCOUNT‘ button.

Perform the migration with Cloud SDK

If you have the appropriate IAM permissions and the required organization policies are enforced in both organizations, you are ready to start migrating Google Cloud projects between organizations.

Here are instructions how to migrate project(s) from one organization to another.

  1. Install gcloud CLI (Google Cloud CLI) on your local computer.
  2. Log into gcloud CLI account using the Google Cloud user which has been granted all the required permissions for project migration.
  3. Run this command to migrate a project:

    gcloud beta projects move PROJECT_ID --organization DESTINATION_ORGANIZATION_ID

    If you would like to migrate a project to a folder under the destination organization, then use this command:

    gcloud beta projects move PROJECT_ID --folder DESTINATION_FOLDER_ID

    Replace the following fields:

    • PROJECT_ID is the ID of the project you wish to migrate.
    • DESTINATION_ORGANIZATION_ID is the ID of the destination organization resource to which you want to move the project to.
    • DESTINATION_FOLDER_ID is the ID of the folder under the the destination organization to which you want to move the project.
  4. Booyah! The project migration to the new organization has been completed.

Conclusion

If you’ve tried moving projects between Google Cloud accounts without any luck in the past, it’s not as complicated as it may appear these days.

The migration process is fairly smooth as long as you can coordinate the process between the owners of both organizations and ensure that proper permissions and policies are set. With this step-by-step guide, you should now have a good understanding of how to migrate a project(s) from one Google Cloud organization to another.

We hope this guide will help you with your assignment! If you have any questions related to Google Cloud migration projects or any other custom software development needs, don’t hesitate to contact the click5 Team.

Best Attorney Website Design Inspirations in 2023

Monday, February 27th, 2023

To help you achieve these goals, we’ve compiled a list of the best attorney website design inspirations for 2023. These websites showcase the latest trends in design and content, and provide valuable insights and inspiration for creating a website that effectively communicates your firm’s value proposition and drives results.

Law For People by Gianaris Trial Lawyers

Law For People by Gianaris Trial Lawyers stands out for its clean and modern design, featuring bold typography and striking visuals. The website’s color scheme of white, black, and gold creates a sense of professionalism and authority. The site’s layout is also user-friendly, making it easy for visitors to find the information they need.

See Case Study   –   Visit Website

Diesel Injury Law

Diesel Injury Law’s website features a sleek and sophisticated design, with a prominent hero image that showcases the firm’s brand identity. The site’s navigation menu is simple and straightforward, allowing users to quickly access the information they need.

See Case Study   –   Visit Website

Cheronis & Parente

Cheronis & Parente’s website is a stellar example of criminal defense attorneys law firm’s site. Professional photography boasts a sleek and professional aesthetics of their website that immediately conveys the seriousness and expertise associated with criminal defense. The navigation is intuitive, allowing visitors to easily explore the attorney profiles, practice areas, and the wealth of information about the firm’s legal services.

See Case Study   –   Visit Website

NorthShore Injury Attorney

NorthShore Injury Attorney’s website uses eye-catching visuals, including large background images and bold typography. The site’s layout is clean and easy to navigate, with clear calls to action that encourage visitors to reach out to the firm.

See Case Study   –   Visit Website

Benzene Lawyers

Benzene Lawyers’ website features a striking design that conveys a sense of professionalism and expertise. The site’s use of white space and minimalist design elements creates a clean and modern look. The site’s content is also informative and engaging, providing visitors with valuable information about the firm’s practice areas.

Visit Website

Palmeiro Law Group

Palmeiro Law Group’s website features a clean and modern design that is both visually appealing and user-friendly. The site’s use of colors, typography, and imagery effectively conveys the firm’s brand identity. The site’s content is also well-organized, making it easy for visitors to find the information they need.

See Case Study   –   Visit Website

Best Practices for Lawyer Websites

In addition to studying the best lawyer website design Chicago inspirations, it’s also important to follow best practices for creating effective lawyer websites. Here are some key tips to keep in mind:

Striking Design

Use design elements that effectively convey your brand identity and create a professional and authoritative look. This includes choosing a color scheme that aligns with your brand, using high-quality images, and ensuring that the website is optimized for all devices.

Compelling & Engaging Content

Provide visitors with valuable information about your practice areas and highlight your expertise in the field. This includes creating engaging copy, using video and other multimedia to enhance the user experience, and incorporating testimonials from satisfied clients.

Clear Outline of Your Practice Areas

Make it easy for visitors to understand the scope of your practice and the services you offer. This includes using clear and concise language to describe your practice areas, providing examples of cases you have successfully handled, and including attorney biographies.

Follow SEO Best Practices

Optimize your website for search engines to increase your visibility and attract more clients. This includes using relevant keywords in your content, optimizing your meta tags and descriptions, and ensuring that your website is mobile-friendly.

Claim your Google Business Profile

This is important for local SEO and helps you appear in Google’s “local pack.” Claiming your Google Business Profile also allows you to manage your online reputation, respond to reviews, and provide visitors with valuable information about your firm.

Ask for Reviews

Encourage satisfied clients to leave reviews on your Google Business Profile or other review sites, as this can help build your online reputation and attract more clients.

By following these best practices, law firms can create effective websites that engage visitors, communicate their value proposition, and drive results. Whether you’re looking to create a new website or update your existing one, taking the time to study the best Chicago website design inspirations and implement best practices can help you achieve your online marketing goals and grow your business.

Frequently Asked Questions

Why do lawyers need a website?

Having a website allows law firms to establish a professional online presence, reach a wider audience, and showcase their expertise in the field. It also allows firms to communicate with clients and potential clients more effectively, providing them with valuable information about their practice areas.

What makes a good law firm website?

A good law firm website is visually appealing, user-friendly, and informative. It effectively conveys the firm’s brand identity, highlights its expertise in the field, and provides visitors with valuable information about the firm’s practice areas. Also, it has clear options to contact the law office via phone, online inquiry or chat.

What’s the best content for a law firm website?

The best content for a law firm website includes information about the firm’s practice areas, attorney biographies, testimonials, and frequently asked questions. The content should be informative and engaging, providing visitors with valuable information about the firm and its services.

How much does a law firm web design cost?

The cost of a law firm web design can vary depending on the complexity of the website, the number of pages, and the level of customization required. A simple website with a basic design could cost anywhere from $2,500 to $5,000, while a more complex website with custom design and advanced features could cost upwards of $10,000 or more.

Websites for Attorneys: Conclusion

A well-designed and informative website is an essential tool for any law firm looking to establish a professional online presence, attract new clients, and showcase its expertise in the field. The best attorney website design inspirations in 2023 combine striking design elements with compelling content, making it easy for visitors to find the information they need and take action.

Whether you’re looking to create a new website or update your existing one, studying the best attorney website design inspirations can provide valuable insights and inspiration for creating a website that stands out from the competition and drives results. By following best practices for lawyer websites, law firms can increase their visibility, attract more clients, and build a strong online reputation. Do not hesitate to contact click5 team if you are looking to develop a new website for your law office. We would be happy to assist!

The Must Have WordPress Plugins in 2023

Monday, January 2nd, 2023

As a website owner or developer, you understand the significance of having good plugins that are kept updated and optimized. One of the keys to achieving a well-functioning website is by using the right plugins. These plugins can make a significant difference in the functionality and performance of your website. With so many options available on the market, how do you know which plugins are essential for your website? In this post, we’ll be discussing the must-have WordPress plugins in 2023.

Importance of Quality WordPress Plugins

Good WordPress plugins are essential for the success of any website or blog. They add new features, improve performance, and enhance the user experience. It’s important to choose plugins that are kept updated, optimized, and available for a free download. This ensures that your website stays secure, up-to-date, and runs smoothly.

Must Have WordPress Plugins

Here are the must have WordPress plugins in 2023 for any business website recommended by the click5 team:

  1. Advanced Custom Fields

    Advanced Custom Fields is a powerful plugin that allows you to create custom fields and edit screens for your WordPress website. This plugin is a must-have for any website that requires custom data input, such as portfolios, testimonials, and team member profiles. The plugin is easy to use and comes with a variety of field types, including text, images, and files. Since the recent user interface update, it became pretty easy to use.
    Download

  2. Classic Editor

    The Classic Editor plugin brings back the classic editing experience in WordPress, making it easier to use for those who are not familiar with the block editor. This plugin is particularly useful for those who prefer the classic editor and find the block editor too complex or confusing.
    Download

  3. Contact Form 7

    Contact Form 7 is a popular plugin for creating contact forms on your WordPress website. This plugin is easy to use and comes with a variety of options and configurations, making it a must-have for any website that requires a contact form. It also allows for easy integrations with popular CRMs, including click5 CRM.
    Download

  4. Disable Comments by click5

    The Disable Comments plugin by click5 allows you to disable comments on your WordPress website with just a few clicks. This plugin is particularly useful for those who want to prevent spam comments and maintain a clean and organized comment section on their website.
    Download

  5. History Log by click5

    The History Log plugin by click5 allows you to keep track of changes made to your WordPress website. This plugin is particularly useful for website owners who have multiple users managing the website with different levels of access. The plugin keeps a log of all changes made to the website, making it easier to identify and resolve any issues. Its automatic email updates help to stay up to date about any issues with your website.
    Download

  6. Site Kit by Google

    Site Kit by Google is a plugin that brings together all the necessary Google tools for WordPress in one place. This plugin is a must-have for website owners who want to integrate Google services such as Google Analytics, AdSense, and PageSpeed Insights.
    Download

  7. Sitemap by click5

    The WordPress Sitemap plugin by click5 allows you to easily create and manage a sitemap for your WordPress website. It’s the best WordPress sitemap plugin to create and customize HTML and XML sitemaps for your website. This plugin is particularly useful for those who want to improve their website’s SEO and make it easier for search engines to crawl and index their site.
    Download

    In our other article How to Create a Sitemap in WordPress, we are explaining what is a website sitemap, and the differences between HTML and XML sitemaps. Then, we walk you through the process of creating both sitemaps, and submitting your site to Google Search Console.

  8. Wordfence Security

    Wordfence Security is a plugin that provides security for your WordPress website. This plugin is a must-have for website owners who want to protect their website from security threats, such as hacking and malware.
    Download

  9. WP Mail Log

    WP Mail Log is a plugin that logs all emails sent from your WordPress website. This plugin is particularly useful for those who want to keep track of all the emails sent from their website and troubleshoot any issues.
    Download

  10. Yoast SEO

    Yoast SEO is a comprehensive SEO plugin for WordPress that helps you optimize your website for search engines. This plugin is a must-have for website owners who want to improve their website’s SEO and attract more organic traffic. With Yoast SEO, you can easily optimize your website’s content, meta descriptions, and images, among other things.
    Download

These are the recommended WordPress plugins that the click5 team uses for every website. However, there are more plugins that they use on a case-by-case basis, depending on the specific needs and requirements of each website. Some of the Chicago website design projects are more challenging and require unique plugins, in some instances click5 team develops custom WordPress plugins, to meet project requirements.

Conclusion

In conclusion, having good plugins that are updated and optimized is crucial for the success of any website. The plugins listed in this post are the must-have WordPress plugins in 2023, according to the click5 team. Whether you’re a website owner or developer, these plugins can help you improve the functionality and performance of your website. If you have any questions or need help with your WordPress website, feel free to reach out to the click5 team for professional and reliable support.

How to Create a Sitemap in WordPress

Sunday, December 18th, 2022

In this guide, we will show you how to create a sitemap in WordPress using the “Sitemap by click5” plugin, which is a reliable and user-friendly solution for generating HTML and XML sitemaps for WordPress websites and blogs.

What is a Website Sitemap?

A sitemap is a page or file that lists all the pages on your website, providing information on the organization and structure of your site. WordPress sitemap helps search engines crawl and index your site more effectively. There are two main types of sitemaps: HTML and XML.

An HTML sitemap is a page on your website that lists all the pages and links to them, providing a clear structure and easy navigation for visitors.

An XML sitemap, on the other hand, is a file that provides search engines with information about the pages on your website. It helps search engines find, crawl and index your site more efficiently, which can improve your search engine rankings and increase your website’s visibility.

Difference between HTML and XML Sitemaps

While both HTML and XML sitemaps serve different purposes, they are both important for your website’s visibility and SEO.

HTML sitemaps help visitors navigate your site more easily, providing a clear and organized structure that can improve user experience.

XML sitemaps, on the other hand, are designed to provide search engines with information about the pages on your website, making it easier for them to crawl and index your site.

Why is Sitemap so important?

A sitemap is important for your website’s SEO because it helps search engines crawl and index your site more effectively. Without a sitemap, search engines may miss important pages on your site, which can hurt your search engine rankings and reduce your website’s visibility.

Creating a sitemap can also help you identify any issues with your site’s structure or organization, making it easier to optimize your site for search engines and improve your website’s performance.

How to Create an HTML Sitemap in WordPress?

To create an HTML sitemap in WordPress, you can use the “Sitemap by click5” plugin, which provides a user-friendly and customizable solution for generating sitemaps.

Here’s how to create an HTML sitemap in WordPress using the Sitemap by click5 plugin:

  1. Install and activate the Sitemap by click5 plugin from the WordPress repository.
  2. After installing the plugin, navigate to the “Sitemap” tab in your WordPress dashboard.
  3. Customize your sitemap by selecting the pages you want to include, setting the maximum number of links per page, and customizing the style and layout of your sitemap.
  4. Once you have customized your sitemap, you can publish it by using the shortcode provided by the plugin – [click5_sitemap]. You can add this shortcode to any page on your site to display your HTML sitemap.

How to Create an XML Sitemap in WordPress?

To create an XML sitemap in WordPress, you can also use the “Sitemap by click5” plugin, which provides a user-friendly and customizable solution for generating sitemaps.

Here’s how to create an XML sitemap in WordPress using the Sitemap by click5 plugin:

  1. Install and activate the Sitemap by click5 plugin from the WordPress repository.
  2. After installing the plugin, navigate to the “Sitemap” tab in your WordPress dashboard.
  3. Customize your sitemap by selecting the pages you want to include and setting the frequency and priority for each page.
  4. Once you have customized your sitemap, you can generate the XML file by clicking on the “Generate XML Sitemap” button provided by the plugin.
  5. The plugin will generate an XML file that you can download to your computer.

How to Submit XML Sitemap to Google?

Once you have created an XML sitemap for your WordPress website, you can submit it to Google to help the search engine crawl and index your site more efficiently.

Here’s how to submit your XML sitemap to Google:

  1. Sign in to your Google account, and go to Google Search Console.
  2. First, you will need to create a new Property in Google Search Console. Start with selecting the property type. Select the “URL prefix” option, enter your website address, and click the Continue button.
  3. Then, you will have to verify the ownership of the website. Download the HTML file and upload it to the root folder of your website. Once uploaded, click on the Verify button.
  4. Once ownership has been verified, go to your website property in your account.
  5. Click on “Sitemaps” from the left-hand menu.
  6. Enter the URL of your XML sitemap in the “Add a new sitemap” field.
  7. Click on the “Submit” button to add your sitemap to Google Search Console.

That’s it! You have successfully submitted your XML sitemap to Google Search Console. Now, give Google a few days to crawl your website.

Frequently Asked Questions

Where can I find my sitemap in WordPress?

A: The XML sitemap is usually located in the root folder of your website domain. Default location is: https://www.yourdomain.com/wp-sitemap.xml. If you are using a plugin, then the location can be https://www.yourdomain.com/sitemap.xml or https://www.yourdomain.com/sitemap-index.xml

How often should I update my sitemap?

A: It’s a good idea to update your sitemap whenever you add or remove pages from your website, or make significant changes to the structure or organization of your site. Most of the WordPress Sitemap plugins, like “Sitemap by click5”, will automatically update your sitemap everytime there is a change in content on your website.

Can I create a sitemap manually?

A: While it is possible to create a sitemap manually, it can be time-consuming and prone to errors. Using a plugin like Sitemap by click5 is a more efficient and reliable solution for creating sitemaps.

How does a sitemap improve my website’s SEO?

A: XML sitemap helps search engines crawl and index your site more efficiently, which can improve your website’s search engine rankings and increase your site’s visibility.

What is the best sitemap plugin for WordPress?

A: It’s not a secret that “Sitemap by click5” is the best sitemap plugin for WordPress. It’s available for download from the official plugin repository at WP.org.

Summary

Creating a sitemap for your WordPress website is an essential step in optimizing your site for search engines. “Sitemap by click5” is a reliable and user-friendly plugin that can help you generate both HTML and XML sitemaps. By following the steps outlined in this guide, you can create and submit a sitemap to Google, helping to improve your website’s SEO and increase your site’s visibility.

If you have any questions or need help with your WordPress website, feel free to contact the click5 team for professional and reliable support. Founded in 2012, click5 Interactive is the premiere Chicago website design and custom software development company, focused on developing cutting-edge websites and applications.